SAP BASIS Support and Training Jobs

SAP BASIS Consultant Jobs , SAP BASIS Training, SAP BASIS Tutorials

Monday, 22 June 2015

SAP SUM Tool (Software Update Manager)

What is SUM?

SUM Stands for Software Update Manager .It’s a multipurpose tool that used to perform release     upgrade , Enhancement package installation ,applying or upgrading support package stack(SPS) and can upgrade a single component on SAP netweaver, Java Patches, Correcting Installed Software Information, Database Migration Option (DMO) .
.
Why SUM?

Usually SPAM\SAINT tool are used to upgrade components in SAP netweaver. By using SUM we can
·         * Minimize Downtime.
·         * Shadow system .
·         * Unicode conversion supported in enhancement package scenario.
·         * Support for selectively installable instances.
·          
Download SUM latest version from Market Place

Either by the path in SAP Software Download Center to download the SUM: Ã  Support Packages and Patches Ã  A - Z Index Ã  S Ã  SL TOOLSET Ã  SL TOOLSET 1.0 Ã  Entry by Component Ã  SOFTWARE UPDATE MANAGER (SUM) Ã  SOFTWARE UPDATE MANAGER 1.0 Ã  Support Package Patches Ã  <your OS> Ã .

OR By the path shown in the figure.


Here i'm upgrading Solution manager 7.1 SR1 with SPS04 to the latest SPS13 .Download the SPS13 Exports from the market place and put it in a folder. After completing SUM tool download , UNCAR the Sum tool into a folder using sapcar.


Once you have downloaded & extracted the SUM tool, start the SUM tool:   ./STARTUP .For that Log in as <SID>adm , And open command prompt with ‘RUN UNDER ADMINISTRATOR’ , from the directory run the STARTUP.bat file through command prompt.


Open up your browser and type the URL <http://<yourdomain.com>:4239> 
Where <yourdomain> is the host name ,and 4239 is the default port that opened for SUM.


It will open a screen asking username and password to operate the SUM .Fill the entries at once and it ll pass to the next screen. Click on the Next button


Enter The password for <SID>adm user


Select the Stack.XML file located in the SPS directory  -> Next.


In the next screen find the Keyword From the SAPNOTE given.


5.1 initialization :-

 Once the confirm target phase completed the installation will start ,The first phase initialization will start .


5.2 Extraction :

Once the Initialization phase Completed ,by clicking Next the next phase Extraction will start.


While in the Extraction phase SUM will ask for the DDIC Password.


In order to run SUM ,the SAP instance which we have to make change should be active ,otherwise this phase will throw some error like this..Click continue 

SUM will now check for the SPAM\SAINT version we can manually or automatically upgrade to its latest version.


5.3 Configuration phase:-  

And with in some time Extraction phase will be over and enter to the Configuration phase by clicking next.In that phase we ought to select and give some settings maually like below:-


Enter the Keyword from the SAPNOTE.


If you want to  adjust SPAU/SPDD objects  or simply click continue


5.4 Checks Phase:- 

After Completion of Configuration phase by clicking next we are entering into the Checks phase where SUM checks for the requirements for SPS upgrade.


5.5 Preprocessing Phase:- Next Step is preprocessing phase .


Perform the Backup


5.6 Execution Phase:-

 Next step is Execution The software update manager will now perform the actual update in the system. 


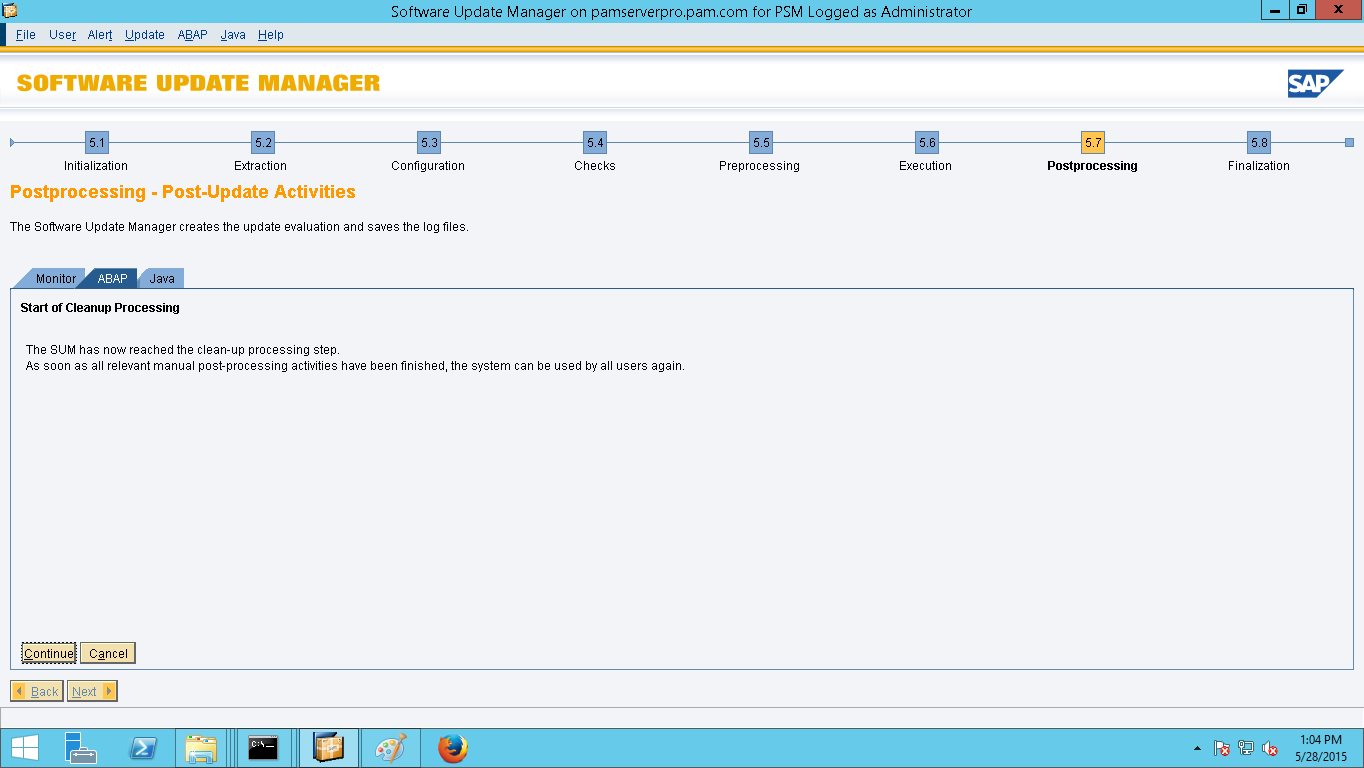
Postprocessing Phase :-

 Once the Execution Phase completed SUM will enter into the Postprocessing steps.


click continue button


5.6 Finalization Phase:- 

At last Finalization step ,No manual actions required in this phase 

Summery :-


 Done!! Now the SPS of your system has been upgraded.To Check whether the upgrade completed or not ..
Goto https://support.sap.com/release-upgrade-maintenance/pam.html and see the components and there levels and compare it with the current SAP system components (Goto SPAM\SAINT >> Package level )and check the component SP level with SP level of the SPS in PAM(product availability matrix)

Monday, 15 June 2015

SAP Router Configuration

                                           SAP Router Configuration


1     1.  Download the latest saprouter from the Marketplace

Ø  Login to the SAP Support Portal with the S-user ID which is assigned to your installation.
Ø  Use the latest SAProuter version, which can be downloaded from the SAP Software Download Center.
Ø  Support Packages & Patches 
Ø  A-Z Alphabetical List of Products 
Ø  S
Ø  SAPROUTER
Ø  SAPROUTER (latest version)
Ø  your preferred O.S. version
Ø  saprouter_XXX-XXXXXXXX.sar

2.  Download the latest SAP Cryptographic Library from the SAP Software Download Area.
Ø  Support Packages & Patches
Ø  A-Z Alphabetical List of Products
Ø  S
Ø  SAPCRYPTOLIB
Ø  COMMONCRYPTOLIB (latest version)
Ø  your preferred O.S. version
Ø  SAPCRYPTOLIBP_XXXX-XXXXXXXX.SAR


3.Executing the commands

·         SAPCAR  -xvf saprouter_XXX-XXXXXXXX.sar will unpack the following files:
saprouter[.exe]
niping[.ex
·         SAPCAR  -xvf SAPCRYPTOLIBP_XXXX-XXXXXXXX.SAR will unpack the following files:
[lib]sapcrypto.[dll|so|sl]
sapgenpse[.exe]

4.Create the new folder
(e.g. /usr/sap/saprouter).  Copy the file that we are extract through SAPCAR.

5.Set the environment variables for SNC_LIB and SECUDIR

My computer (right click)---> properties---> advanced system setting ----> advanced ---> environment variables ---> new


SECUDIR---> path  till saprouter folder
SNC_LIB----> path till sapcrypto.dll
6. Create saprouttab  file in saprouter folder in file format
7. Download the Distinguished Name from the SMP.
www.service.sap.com/saprouter-sncadd


Distinguished Name------> CN=pamserver, OU=0001400618, OU=SAProuter, O=SAP, C=DE
8. Create “certreq” file
Now create a “certreq” file  in the  file format  in saprouter folder
9.Request for router license
Enter the command on the command prompt
Sapgenpse get_pse -v -r certreq -p local.pse “<Distinguished Name>”
eg : Sapgenpse get_pse -v -r certreq -p local.pse “CN=pamserver, OU=0001400618, OU=SAProuter, O=SAP, C=DE”

Now open the certreq file with notepad

Copy the text and past it into the marketplace


Click on Request Certificate 

Copy the text in the executed page

10. Create “srcert” file in the file format in the saprouter folder
 Past the copyed text in the “srcert” file


11. Import the certificate using the below command 

sapgenpse import_own_cert -c srcert -p local.pse


Confirm that the import was successful.
e.g: CA-Response successfully imported into PSE "/usr/sap/saprouter2/local.pse"


9. Create credentials for your PSE and secure your credentials file
sapgenpse seclogin -p local.pse -O <user_for _SAProuter>

 eg : sapgenpse seclogin –p E:\usr\sap\saprouter\local.pse –O administrator
Type in your PIN/Passphrase when prompted
This generates the cred_v2 file


10. check the command

sapgenpse get_my_name -v -n Issuer
This should result to
Issuer  : CN=SAProuter CA, OU=SAProuter, O=SAP Trust Community II, C=DE


11.Now we need to maintain the details in the saprouttab file

Model from SAP Marketplace :

Eg:

12.Download the CA certificate from SAP note 2131531.


Download the object from the sap note. (last of the not)
Copy   smprootca.der  in to the saprouter folder

Import the certificate
 sapgenpse maintain_pk -a smprootca.der -p local.pse

13. SAProuter service creation

Enter  this command to the saprouter service creation

sc.exe create SAPRouter binPath= "saprouter.exe service -r -W 60000 -R saprouttab -K ^p:CN=pamserver, OU=0001400618, OU=SAProuter, O=SAP, C=DE^" start= auto obj= "NT AUTHORITY\LocalService"

Eg: sc.exe create SAPRouter binPath= "E:\usr\sap\saprouter\saprouter.exe service -r -W 60000 -R E:\usr\sap\saprouter\saprouttab -K ^p:CN=pamserver, OU=0001400618, OU=SAProuter, O=SAP, C=DE^" start= auto obj= "NT AUTHORITY\LocalService"


Then goto -----> Services
Right click on SAProuter service----> Propertice-----> logon
Type the user of saprouter and password


 Then goto “regedit”
(search on the system)

HKEY_LOCAL_MACHINE -----> SYSTEM -------> Services -------> saprouter ------>  double click on image path


Remove the  “^”


13.Starting SAProuter


14.Goto OSS1
Parameter-----> Technical Setting
Fill the entries for the OSS connection


15.Goto SM59

Select  ABAP Connections-----> Double click on SAPOSS------->  Connection Test


It show no errors in your Router Connection


Download SAP BASIS Mobile APP

Download SAP BASIS Mobile APP

Sponsor