SAP BASIS Support and Training Jobs

SAP BASIS Consultant Jobs , SAP BASIS Training, SAP BASIS Tutorials

Monday, 15 June 2015

SAP Router Configuration

                                           SAP Router Configuration


1     1.  Download the latest saprouter from the Marketplace

Ø  Login to the SAP Support Portal with the S-user ID which is assigned to your installation.
Ø  Use the latest SAProuter version, which can be downloaded from the SAP Software Download Center.
Ø  Support Packages & Patches 
Ø  A-Z Alphabetical List of Products 
Ø  S
Ø  SAPROUTER
Ø  SAPROUTER (latest version)
Ø  your preferred O.S. version
Ø  saprouter_XXX-XXXXXXXX.sar

2.  Download the latest SAP Cryptographic Library from the SAP Software Download Area.
Ø  Support Packages & Patches
Ø  A-Z Alphabetical List of Products
Ø  S
Ø  SAPCRYPTOLIB
Ø  COMMONCRYPTOLIB (latest version)
Ø  your preferred O.S. version
Ø  SAPCRYPTOLIBP_XXXX-XXXXXXXX.SAR


3.Executing the commands

·         SAPCAR  -xvf saprouter_XXX-XXXXXXXX.sar will unpack the following files:
saprouter[.exe]
niping[.ex
·         SAPCAR  -xvf SAPCRYPTOLIBP_XXXX-XXXXXXXX.SAR will unpack the following files:
[lib]sapcrypto.[dll|so|sl]
sapgenpse[.exe]

4.Create the new folder
(e.g. /usr/sap/saprouter).  Copy the file that we are extract through SAPCAR.

5.Set the environment variables for SNC_LIB and SECUDIR

My computer (right click)---> properties---> advanced system setting ----> advanced ---> environment variables ---> new


SECUDIR---> path  till saprouter folder
SNC_LIB----> path till sapcrypto.dll
6. Create saprouttab  file in saprouter folder in file format
7. Download the Distinguished Name from the SMP.
www.service.sap.com/saprouter-sncadd


Distinguished Name------> CN=pamserver, OU=0001400618, OU=SAProuter, O=SAP, C=DE
8. Create “certreq” file
Now create a “certreq” file  in the  file format  in saprouter folder
9.Request for router license
Enter the command on the command prompt
Sapgenpse get_pse -v -r certreq -p local.pse “<Distinguished Name>”
eg : Sapgenpse get_pse -v -r certreq -p local.pse “CN=pamserver, OU=0001400618, OU=SAProuter, O=SAP, C=DE”

Now open the certreq file with notepad

Copy the text and past it into the marketplace


Click on Request Certificate 

Copy the text in the executed page

10. Create “srcert” file in the file format in the saprouter folder
 Past the copyed text in the “srcert” file


11. Import the certificate using the below command 

sapgenpse import_own_cert -c srcert -p local.pse


Confirm that the import was successful.
e.g: CA-Response successfully imported into PSE "/usr/sap/saprouter2/local.pse"


9. Create credentials for your PSE and secure your credentials file
sapgenpse seclogin -p local.pse -O <user_for _SAProuter>

 eg : sapgenpse seclogin –p E:\usr\sap\saprouter\local.pse –O administrator
Type in your PIN/Passphrase when prompted
This generates the cred_v2 file


10. check the command

sapgenpse get_my_name -v -n Issuer
This should result to
Issuer  : CN=SAProuter CA, OU=SAProuter, O=SAP Trust Community II, C=DE


11.Now we need to maintain the details in the saprouttab file

Model from SAP Marketplace :

Eg:

12.Download the CA certificate from SAP note 2131531.


Download the object from the sap note. (last of the not)
Copy   smprootca.der  in to the saprouter folder

Import the certificate
 sapgenpse maintain_pk -a smprootca.der -p local.pse

13. SAProuter service creation

Enter  this command to the saprouter service creation

sc.exe create SAPRouter binPath= "saprouter.exe service -r -W 60000 -R saprouttab -K ^p:CN=pamserver, OU=0001400618, OU=SAProuter, O=SAP, C=DE^" start= auto obj= "NT AUTHORITY\LocalService"

Eg: sc.exe create SAPRouter binPath= "E:\usr\sap\saprouter\saprouter.exe service -r -W 60000 -R E:\usr\sap\saprouter\saprouttab -K ^p:CN=pamserver, OU=0001400618, OU=SAProuter, O=SAP, C=DE^" start= auto obj= "NT AUTHORITY\LocalService"


Then goto -----> Services
Right click on SAProuter service----> Propertice-----> logon
Type the user of saprouter and password


 Then goto “regedit”
(search on the system)

HKEY_LOCAL_MACHINE -----> SYSTEM -------> Services -------> saprouter ------>  double click on image path


Remove the  “^”


13.Starting SAProuter


14.Goto OSS1
Parameter-----> Technical Setting
Fill the entries for the OSS connection


15.Goto SM59

Select  ABAP Connections-----> Double click on SAPOSS------->  Connection Test


It show no errors in your Router Connection


Tuesday, 5 May 2015

SAP SANDBOX Creation

SAP SANDBOX Creation

Thursday, 15 January 2015

SAP Client Administration


What is an R/3 Client?

R/3 Client is defined as an independent accountable business unit within an R/3 system.

R/3 Data Classification

Data in the R/3 database are classified as two types, Client Independent Data and Client Dependent Data.
Client independent data / Cross client data:
Data which can be accessible through entire R/3 database from any client is called as client independent data or cross client data. Ex: screen data, transaction data, repository data and dictionary data.
Client dependent data / Client specific data:
Data which can be accessible through a client in which it was created is called as client dependent data or client specific data. Ex: user data, authorization data, application data.
As per above two types, the R/3 client maintains differentiation with respect to client dependent data. A number of clients are created in one R/3 database to maintain differentiation in customization, testing, quality assurance and production data.
R/3 client can be identified with three digit numeric number starts from 000 to 999.

Customizing request(SE10)

Customizing requests contain changes to client-dependent tables.
Customizing request records client dependent objects like table entries, SPRO configurations. Client dependent objects are only available to particular client. 

SE01, SE09 and SE10 are the transaction codes for SAP Transport Management system.


Workbench request(SE09)  

Workbench requests contain changes to client-independent tables.
Workbench request records client independent objects like reports, Functions, tables. Client independent objects are available across the system irrespective of client.  


Default  SAP clients

After installation there are three default clients configured in database. Which are (for Non-Ides Software)
000     Master Client
001    Copy of master client
066    Early watch client
For IDES Software we have clients 800, 810, 812
 
Client 000 - Client 000 is a special client in SAP since it has client independent settings. Client 000 in SAP R/3 comes with a simple organizational structure. It is a sort of test company. Client 000 contains all standard configurations, parameters, standard transactions, etc that are normally used in the SAP R/3 business environment.

Client 001 - Client 001 is a copy of client 000. Client 001 also includes a test company. Client 001 can be customized to prepare it to move it into the production environment. However, once client 001 is customized, it does not behave like client 000.

Client 066 - Client 066 is used to perform "Early Watch" service for customer systems.
One important thing to remember is that during SAP R/3 implementation, once SAP is installed, the first thing to be done is copy a standard client included in SAP R/3 package. With the help of this, SAP users can start using SAP for creating tests, training, or even start using it for customization.

 Client Management (create, copy, delete, refresh...)

SCC1-Client Copy-Special Selections
SCC2->Client transport
SCC3->Log of client copy 
SCC4->Create/ Change / Display / Edit clients (Client Administration)
SCC5->Delete a client copy 
SCC6->Client Import
SCC7->Post client import 
SCC8->Client Export 
SCC9->Remote Cleint copy 

SCCL->Local client copy 


1.Create a New Client (TC SCC4)

 Login with user SAP*.


 We need  Logical System to create a client .

/nbd54 t-code is used for creating logical system then we go to se09 and Release.

Logical System

When data is distributed between different systems, each system within a network has to be clearly identifiable. The “logical system” deals with this issue.
A logical system is an application system in which the applications work together on a common data basis. In SAP terms, the logical system is a client.
Since the logical system name is used to identify a system uniquely within the network, two systems cannot have the same name if they are connected to each other as BW systems or as source systems, or if there are plans to connect them in any way.
SR047 lists names that cannot be given to BW systems, because they are reserved for internal use.
Logical system names must contain capital letters and numbers only. SAP recommends the following naming convention for logical system names: <System-ID>CLNT<Client>.


/nbd54--->Creating Logical Space


/nse09--->Generate Transport Request


Release our logical system and come back to scc4
Then we press display change button(Ctrl+F4) After that we type  New entries


Save and press back button that time we see our new client


Then we exit to log on screen give new client  user name Sap* and password pass before we create a new user(/nsu01)


How to Find SAP Client Size?

1. Execute report RSSPACECHECK in transaction code SE38.


Put the client number and  mark all fields with as-tricks execute.


it will take 1-2 hour to calculate size


2.SAP Client Copy (/nsccl)


SCC1 (Client Copy - Special Selections) is a standard SAP transaction code available within R/3 SAP systems depending on your version and release level.

Menu Path for transaction SCC1
SAP Menu->Tools->Administration->Administration->Client Administration->Special Functions
->Copy Transport Request


what is the different between SCCL(local client copy), then SCC1(client copy- special selections)?

SCCL is performed during the creation of new client. The coping of data takes place from source client to destination client within the system.We need to select the type of profile during the client copy such as SAP_ALL,SAP_CUST,SAP_USER etc. during the client copy process.

SCC1 is performed to transport requests from one client to another client within the SAP System.
Txn SCC1 tends to be use by functional team to copy their change from one client to another client via transport without releasing the transport.
Generally it is performed when technical and functional consultants are working on one client, then the changes are tested in another client.

Local Client Copy:-This method is used to copy client with in the same instance (SID).It is done by T-Code SCCL


User master data – such as parameters, authorization, user groups
Customizing data – such as organizational units, assignments, and document types
Application data – such as business transaction data, and material master data


1. Log on to this new target client with user SAP* and default password pass.
2.  Start the client copy using transaction sccl.
3.  Select the source client and the copy profile.
4.  Schedule the client copy in background
5.  The client copy logs are available in scc3.


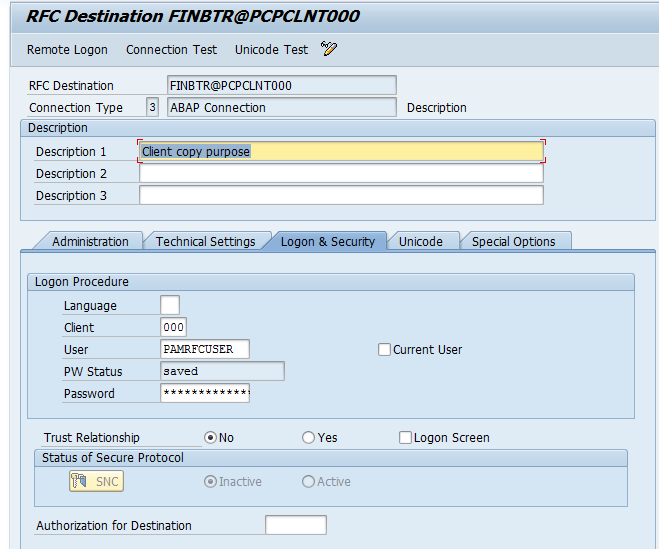
Ø Create RFC Destination for the source client
We have to create RFC connection in order to make client copy ,if there is no RFC connection it will show up right before client copy.

ERROR:
RFC destination for client copy in systems with Financials Basis (FINBASIS) component.
The system could not find any suitable RFC destination for processing for client 000.
This note also appears if an RFC destination was found but this does no work.
o   RFC destination: FINBTR@ID3CLNT000

o   Error text: 


Proceed as follows to eliminate this error:

1.      Log in to Client 000
2.      Go to SM59 Start the wizard to create a new RFC connection

3.      Create a new RFC Destination with name FINBTR@<SID>CLNT000 as follows


4.      Click on Logon & Security Tab >>Fill the client column with source client and a valid user and password >>SAVE. 


5.      Enter tcode  FINB_TR_DEST >> From the following screen check whether the newly created RFC Destination is there in the destination Column , if not bring that RFC destination we created and replace the older one .>>SAVE 


6.  Start the client copy 

Ø Local Client Copy (SCCL)
Log in to the newly created (Here 500)  client with username SAP* and password PASS
1.  Go to SCCL >> Fill the fieldsàSchedule as Background


2. From the following screen select Background server (Optional)>>Schedule job  


3.Specify the date and time when we have to run the job and press save.


4. It will lead the confirmation screen>>continue


5.Go to Sm37 >> From we can see the background job is running successfully.


6. Go to SCC3

We can monitor logs and status of the client copy process from here. And also it shows warnings and errors if any .. Approximately it’ll take 2 to 3 hours for the completion of process.  


3. SCC5 Delete a client copy 

Which client you want to delete logon to that and give SCC5. It will delete particular client


Download SAP BASIS Mobile APP

Download SAP BASIS Mobile APP

Sponsor